The following information guides you through the tasks you must perform to
create the SNA infrastructure that WebSphere MQ requires. This example
creates the definitions for a partner node and LU on OS/2.
Use snap start followed by xsnapadmin to enter the HP
SNAplus2 configuration panels. You need root authority to use
xsnapadmin.
SNAplus2 configuration involves the following steps:
- Defining a local node
- Adding a Token Ring Port
- Defining a local LU
The SNAplus2 main menu, from which you will start, is shown below:
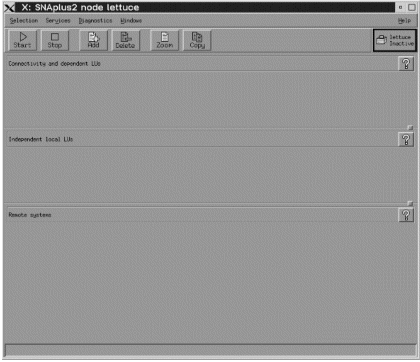
- From the SNAplus2 main menu, select the Services
pull-down:
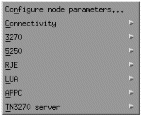
- Select Configure node
parameters.... The following panel is
displayed:
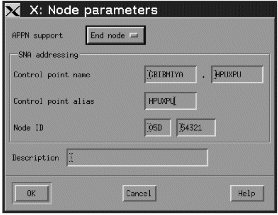
- Complete the Control point name with the values Network
name ((4)) and Control point name ((2)).
- Enter the Control point name ((2)) in the Control
point alias field.
- Enter the Node ID ((3)).
- Select End node.
- Press OK.
A default independent local LU is defined.
- From the main SNAplus2 menu, select the Connectivity and dependent LUs
panel.
- Press Add. The following panel is displayed:
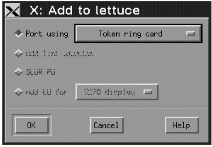
- Select a Token Ring Card port and press OK. The
following panel is displayed:
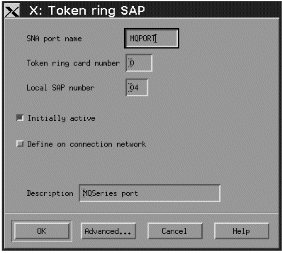
- Enter the SNA port name ((9)).
- Enter a Description and press OK to take the default
values.
- From the main SNAplus2 menu, select the Independent local LUs
panel.
- Press Add. The following panel is displayed:

- Enter the LU name ((5)) and press OK.
APPC configuration involves the following steps:
- Defining a remote node
- Defining a partner LU
- Defining a link station
- Defining a mode
- Adding CPI-C information
- Adding a TP definition
- From the main SNAplus2 menu, select the Remote systems panel.
- Press Add. The following panel is displayed:
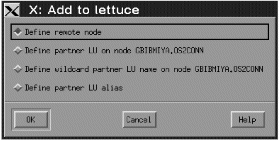
- Select Define remote node and press OK. The
following panel is displayed:
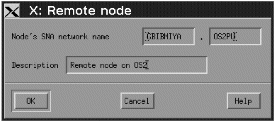
- Enter the Node's SNA network name ((13)) and a
Description.
- Press OK.
- A default partner LU with the same name is generated and a message is
displayed.
- Press OK.
- From the main SNAplus2 menu, select the remote node in the Remote systems
panel.
- Press Add. The following panel is displayed:
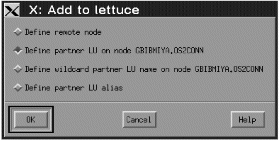
- Select Define partner LU on node node name.
- Press OK. The following panel is displayed:
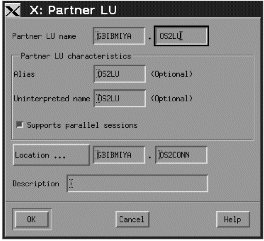
- Enter the partner LU name ((15)) and press
OK.
- From the main SNAplus2 menu, select the Connectivity and dependent LUs
panel.
- Select the MQPORT port.
- Press Add. The following panel is displayed:
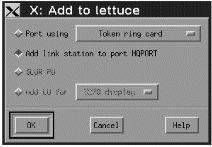
- Select Add link station to port MQPORT.
- Press OK. The following panel is displayed:

- Enter the Name of the link station ((12)).
- Set the value of Activation to "On demand".
- Select Independent only.
- Press Remote node... and select the value
of the remote node ((14)).
- Press OK.
- Set the value of Remote node type to "End or LEN
node".
- Enter the value for MAC address ((19)) and press
Advanced.... The following panel is
displayed:
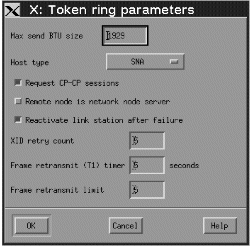
- Select Reactivate link station after failure.
- Press OK to exit the Advanced...
panel.
- Press OK again.
- From the SNAplus2 main menu, select the Services
pull-down: The following panel is displayed:
- Select APPC. The following panel is displayed:
- Select Modes.... The following
panel is displayed:
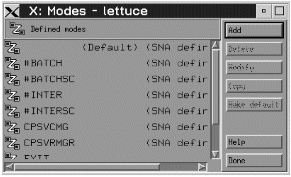
- Press Add. The following panel is displayed:
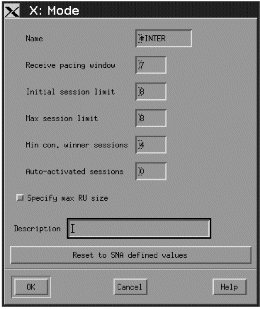
- Enter the Name to be given to the mode ((17)).
- Set the values of Initial session limit to 8, Min
con. winner sessions to 4, and Auto-activated sessions
to 0.
- Press OK.
- Press Done.
- From the SNAplus2 main menu, select the Services
pull-down:
- Select APPC. The following panel is displayed:
- Select CPI-C.... The following
panel is displayed:
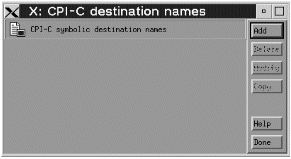
- Press Add. The following panel is displayed:
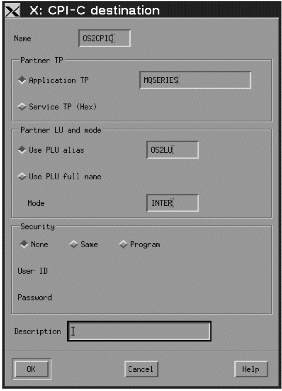
- Enter the Name ((18)). Select Application
TP and enter the value ((16)). Select Use PLU
alias and enter the name ((15)). Enter the Mode
name ((17)).
- Press OK.
Invokable TP definitions are kept in the file /etc/opt/sna/sna_tps.
This should be edited to add a TP definition. Add the following
lines:
  [MQSERIES]
      PATH = /users/interops/HPUX.crs6a
      TYPE = NON-QUEUED
      USERID =  mqm
      ENV = APPCLLU=HPUXLU
      ENV = APPCTPN=MQSERIES
See WebSphere MQ for HP-UX invokable TP setup for more information about TP definitions.
To add a TP definition:
- Select Services pulldown and select APPC as for
CPI-C information.
- Select Transaction Programs. The following panel is
displayed:
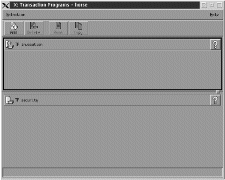
- Select Add. The following panel is displayed:
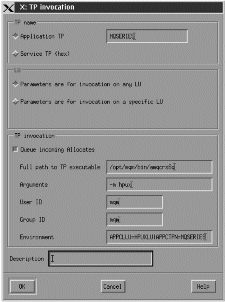
- Enter TP name ((7)) in the Application TP
field.
- Mark Incoming Allocates as non-queued.
- Enter Full path to executable ((10)).
- Enter -m Local queue manager ((11)) in the
Arguments field.
- Enter mqm in the User ID and Group ID
fields.
- Enter environment variables APPCLLU=local LU ((5)) and
APPCTPN=Invokable TP ((7)) separated by the pipe character
in the Environment field.
- Press OK to save your definition.
The SNAplus2 control daemon is started with the snap start
command. Depending on the options selected at installation, it may
already be running.
The xsnapadmin utility controls SNAplus2 resources.
Logging and tracing are controlled from here. Log and trace files
can be found in the /var/opt/sna directory. The logging files
sna.aud and sna.err can be read using a standard editor such as
vi.
In order to read the trace files sna1.trc and
sna2.trc they must first be formatted by running the command
snaptrcfmt -f sna1.trc -o sna1 which produces a
sna1.dmp file which can be read using a normal editor.
The configuration file itself is editable but this is not a recommended
method of configuring SNAplus2.
The APPCLU environment variables must be set before starting a sender
channel from the HP-UX system. The command can be either entered
interactively or added to the logon profile. Depending on the level of
BOURNE shell or KORN shell program being used, the command will be:
export APPCLLU=HPUXLU (5) newer level
or
APPCLLU=HPUXLU           (5)   older level
export
The connection is now established. You are ready to complete the
configuration. Go to WebSphere MQ for HP-UX configuration.
© IBM Corporation 2002. All Rights Reserved