Verify the level of Communications Server software you have installed by
entering the AIX command:
lslpp -h sna.rte
The level displayed in the response needs to be at least Version
5.0.
To update the SNA configuration profile, you need root authority.
(Without root authority you can display options and appear to modify them, but
cannot actually make any changes.) You can make configuration changes
when SNA is either active or inactive.
The configuration scenario that follows was accomplished using the
graphical interface.
- Note:
- The setup used is APPN using independent LUs.
If you are an experienced user of AIX, you may choose to circumvent the
panels and use the command-line interface. Refer to the SNA Server
for AIX Configuration Reference manual to see the commands that
correspond to the panels illustrated.
Throughout the following example, only the panels for profiles that must be
added or updated are shown.
This configuration uses a token ring setup. To define the end node
to connect to the network node (assuming that a network node already exists),
you need to:
- Click on Services from the main menu on the main window.
- Select Configuration node parameters ... from the drop-down
list. A window entitled Node parameters appears:
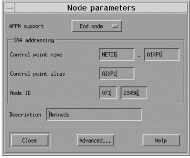
- Click on End node for APPN support.
- In the SNA addressing box, enter a name and alias for the
Control point. The Control point name consists of a Network name
((1)) and a Control point name ((2)).
- Enter the Node ID ((3)) of your local machine.
- Click on OK.
You have now configured your node to connect to the network node.
- Defining your port:
- From the main menu of the main window, click on Services,
Connectivity, and New port ... A window entitled
Add to machine name screen appears.
- Select the default card for connecting to the network (Token ring
card).
- Click on OK. A window entitled Token ring SAP
appears:
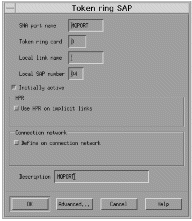
- Enter a port name in the SNA port name box, for example,
MQPORT.
- Check Initially Active.
- Click on OK.
- Defining your connection to the network node:
- From the main menu on the main window, click on Services,
Connectivity, and New link station ...
- Click on OK to link your station to the chosen port
(MQPORT). A window entitled Token ring link
station appears:
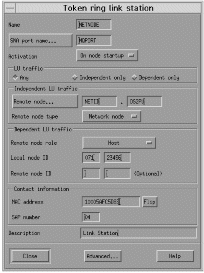
- Enter a name for your link station ((4)), for example,
NETNODE.
- Enter the port name to which you want to connect the link station.
In this case, the port name would be MQPORT.
- Check Any in the LU traffic box.
- Define where the remote node is by entering the control point on the
network node in the Independent LU traffic box. The control
point consists of a Network name ((10)) and a CP name
of adjacent node ((17)).
- Note:
- The network node does not have to be on the remote system that you are
connecting to.
- Ensure the Remote node type is Network node.
- In the Contact information, enter the MAC address
((15)) of the token ring card on the network node.
- Note:
- The network node does not have to be on the remote system that you are
connecting to.
- Click on Advanced .... A window entitled Token
ring parameters appears:
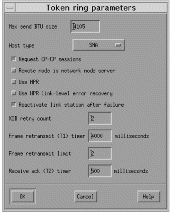
- Check Remote node is network node server.
- Click on OK. The Token ring link station
window remains on the screen.
- Click on OK on the Token ring link station
window.
To define a local LU:
- From the main menu on the main window, click on Services,
APPC, and New independent local LU .... A
window entitled Local LU appears:
Figure 33. Local LU window
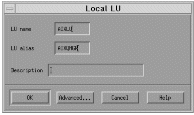
- Enter an LU name ((4)) and alias ((5)).
- Click on OK.
You have now set up a basic SNA system.
To define the mode controlling the SNA session limits:
- From the main menu in the main window, click on Services,
APPC, and Modes .... A Modes
window appears.
- Select the New ... button. A window entitled
Mode appears:
Figure 34. Mode window
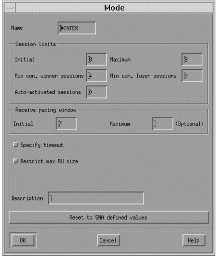
- Enter a Name ((9)) for your mode.
- When you are happy with the session limits, click on OK.
The Modes window remains on the screen.
- Click on Done in the Modes window.
WebSphere MQ allows you to use the Communications Server for AIX V5
graphical interface to configure transaction programs.
If you are migrating from a previous version of MQSeries, you should delete
any existing Communications Server definitions of transaction programs that
can be invoked by WebSphere MQ using the following commands:
- Type
snaadmin delete_tp_load_info.tp_name=xxxxx
- Then type
snaadmin delete_tp.tp_name=xxxxx
An attempt to invoke a previously defined transaction program results in a
SNA sense code of 084B6031. In addition, error message AMQ9213 is
returned. See WebSphere MQ Messages for more
information about this and other WebSphere MQ messages.
You can then re-create the transaction program definition using the
following instructions
From the main window, click Services, APPC, and
Transaction programs ... The following panel is
displayed:
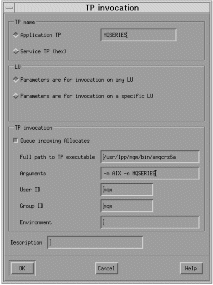
- Type TP name ((6)) in the Application TP
field.
- Clear the Queue incoming Allocates check box.
- Type the Full path to executable ((7)).
- Type -m Local queue manager in the Arguments
field.
- Type mqm in the User ID and Group ID
fields.
- Enter environment variables APPCLLU=local LU ((4)) and
APPCTPN=Invokable TP ((6)) separated by the pipe character
in the Environment field.
- Click OK.
© IBM Corporation 2002. All Rights Reserved