- From your desktop, open the TCP Icon View.
The icons you see may vary from those shown above, depending on how you
have installed the product.
- Start the TCP Configuration program.
- On the Network page, ensure that the IP Address and Subnet
Mask fields have been completed.
- Select the Autostart tab.
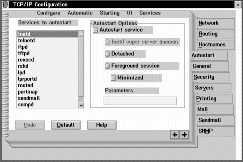
- Ensure that inetd is selected.
- Select the Hostnames tab.
- Ensure that This machine's hostname, Local domain
name, and Nameserver address have been completed.
- Close the configuration notebook.
- Note:
- You may see a panel warning that the inetd superserver has been selected
without selecting servers. Press No to indicate that you do
not wish to correct this.
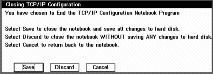
- Press Save to save the changes made.
- Verify that the \MPTN\ETC\SERVICES file, which is located on the drive
where you installed IBM Multi-Protocol Transport Services (MPTS), contains the
following line:
MQSeries 1414/tcp # MQSeries Chan'l Listener
If this line is not present, add it.
- Verify that the file \MPTN\ETC\INETD.LST, located on the same drive
contains the following line:
MQSeries tcp c:\mqm\bin\amqcrsta [-m QMName]
If this line is not present, add it. Note that this assumes you have
installed WebSphere MQ on the default drive and in the default
directories.
- (Re)start the inetd superserver, either by rebooting OS/2 or by stopping
any existing inetd superserver and then entering start inetd on the
command line.