This section describes how to establish an LU 6.2 connection using
Communications Manager/2 Version 1.11. You may use any of the
supported LU 6.2 products for this platform. The panels would
look different from those shown but most of their content would be
similar.
To set up the local node you need to perform these tasks:
- Configure a DLC.
- Configure the local node.
- Add a local LU.
- Add a transaction program definition.
- Configure a mode.
To define the local node characteristics:
- Start the Communications Manager/2 Installation and Setup program by
typing CMSETUP on an OS/2 command line, and pressing Enter.
- Press OK to continue.
- Press Setup to create or modify a configuration.
- Specify a name (up to 8-characters) for a new configuration file
(1), or select the one that you wish to update. The following
examples guide you through the creation of a new configuration file.
Treat them as a guide if you are modifying an existing configuration.
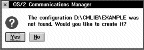
- Press Yes.
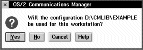
- Press Yes.
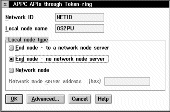
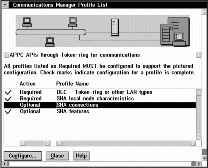
In this example we set up connections using APPC over Token-ring.
The following screen appears in two stages. When you first see it,
highlight the line:
APPC APIs through Token-ring
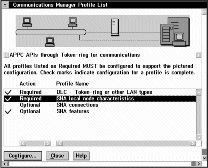
The complete screen appears as shown below.
- Press Configure....
-
- On the APPC APIs through Token ring panel, complete the values for
Network ID ((2)) and Local node name
((3)).
- Select End node - no network node server.
- Click on Advanced.
- Select DLC - Token-ring or other LAN types and press
Configure....
- Enter the value for C&SM LAN ID. This should be the
same value as the Network ID entered earlier ((2)).
- Leave the remaining default values and press OK.
- Select SNA local node characteristics and press
Configure....
- Complete the value for Local node ID (hex) ((4)) using
the values in your configuration worksheet.
- Press Options...
- Complete the value for Local node alias name ((5)) and
press OK.
- Press OK.
- Select SNA features and press
Configure....
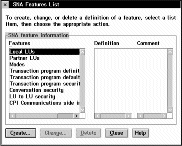
- Select Local LUs and press
Create....
- Complete the fields LU name ((6)) and Alias
((7)).
- Press OK.
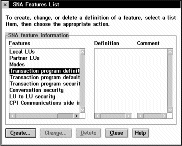
- Select Transaction program definitions and press
Create....
- Complete the values for Transaction program (TP) name
((8)) and OS/2 program path and file name
((9)). If you are going to use Attach Manager to start the
listener program, specify the Program parameter string, for example
-m OS2 -n MQSERIES.
- Press Continue....
- Specify that the program is to be run in the Background and
that it is to be Non-queued, Attach Manager started.
- Press OK.
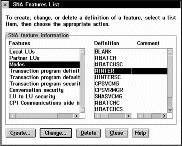
- Select Modes and #INTER and press
Change....
- Ensure that the default values match those shown above and press
Cancel.
- Press Close to close the SNA Features List window.
Local configuration is complete.
The following sections describe how to create connections to other
nodes.
To set up a connection to a peer system the steps are:
- Adding a peer connection
- Defining a partner LU
Start from the Communications Manager Profile List panel.

Select SNA connections and press
Configure....

- Select To peer node and press
Create....
- Select Token-ring or other LAN types and press
Continue....
- Specify a Link name ((11)) and check Activate at
startup.
- Complete the fields LAN destination address (hex)
((12)), Partner network ID ((13)), and Partner
node name ((14)).
- Press Define Partner LUs....
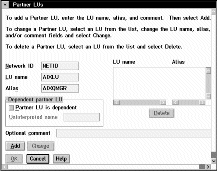
- Complete the fields Network ID ((13)), LU
name ((15)), and Alias ((16)).
- Press Add.
- Press OK.
- Press OK.
- Press Close.
If you have connections to make to other platforms repeat this section as
appropriate.
If you have made all the connections you require proceed to Verifying the configuration to complete Communications Manager/2 configuration.
To set up a connection to a host system, for example z/OS or VSE/ESA, the
steps are:
- Adding a host connection
- Defining a partner LU
Start from the Communications Manager Profile List panel.
Select SNA connections and press
Configure....

- Select To host and press
Create....
- Select Token-ring or other LAN types and press
Continue....
- Specify a Link name ((11)) and check Activate at
startup.
- Complete the fields LAN destination address (hex)
((12)), Partner network ID ((13)), and Partner
node name ((14)).
- Press Define Partner LUs....

- Complete the fields Network ID ((13)), LU
name ((15)), and Alias ((16)).
- Press Add
- Press OK.
- Press OK.
- Press Close.
If you have connections to make to other platforms, proceed to the
appropriate section.
If you have made all the connections you require proceed to Verifying the configuration to complete Communications Manager/2 configuration.
- Press Close to close the Communications Manager Profile List
panel.
- Press Close.
- Press Yes.
- Press OK.
- Press Close.
The LU 6.2 connection is now established. You are ready to
complete the configuration. Go to MQSeries for OS/2 Warp configuration.
© IBM Corporation 2002. All Rights Reserved